1
2
3
4
5
6
7
8
9
10
11
12
13
14
15
16
17
18
19
20
21
22
23
24
25
26
27
28
29
30
31
32
33
34
35
36
37
38
39
40
41
42
43
44
45
46
47
48
49
50
51
52
53
54
55
56
57
58
59
60
61
62
63
64
65
66
67
68
69
70
71
72
73
74
75
76
77
78
79
80
81
82
83
84
85
86
87
88
89
90
91
92
93
94
95
96
97
98
99
100
101
102
103
104
105
106
107
108
109
110
111
112
113
114
115
116
117
118
119
120
121
122
123
124
125
126
127
128
129
130
131
132
133
134
135
136
137
138
139
140
141
142
143
144
145
146
147
148
149
150
151
152
153
154
155
156
157
158
159
160
161
162
163
164
165
166
167
168
169
170
171
172
173
174
175
176
177
178
179
180
181
182
183
184
185
186
187
188
189
190
191
192
193
194
195
196
197
198
199
200
201
202
203
204
205
|
import time
from io import BytesIO
import onnxruntime
from loguru import logger
from base64 import b64decode
import numpy as np
import cv2
from PIL import Image
from ddddocr import DdddOcr
from flask import Flask, request
logger.add("Flask_Web.log", rotation="10 MB", encoding="utf-8", level="INFO")
app = Flask(__name__)
class YOLOV5_ONNX(object):
def __init__(self,onnx_path):
'''初始化onnx'''
self.onnx_session=onnxruntime.InferenceSession(onnx_path)
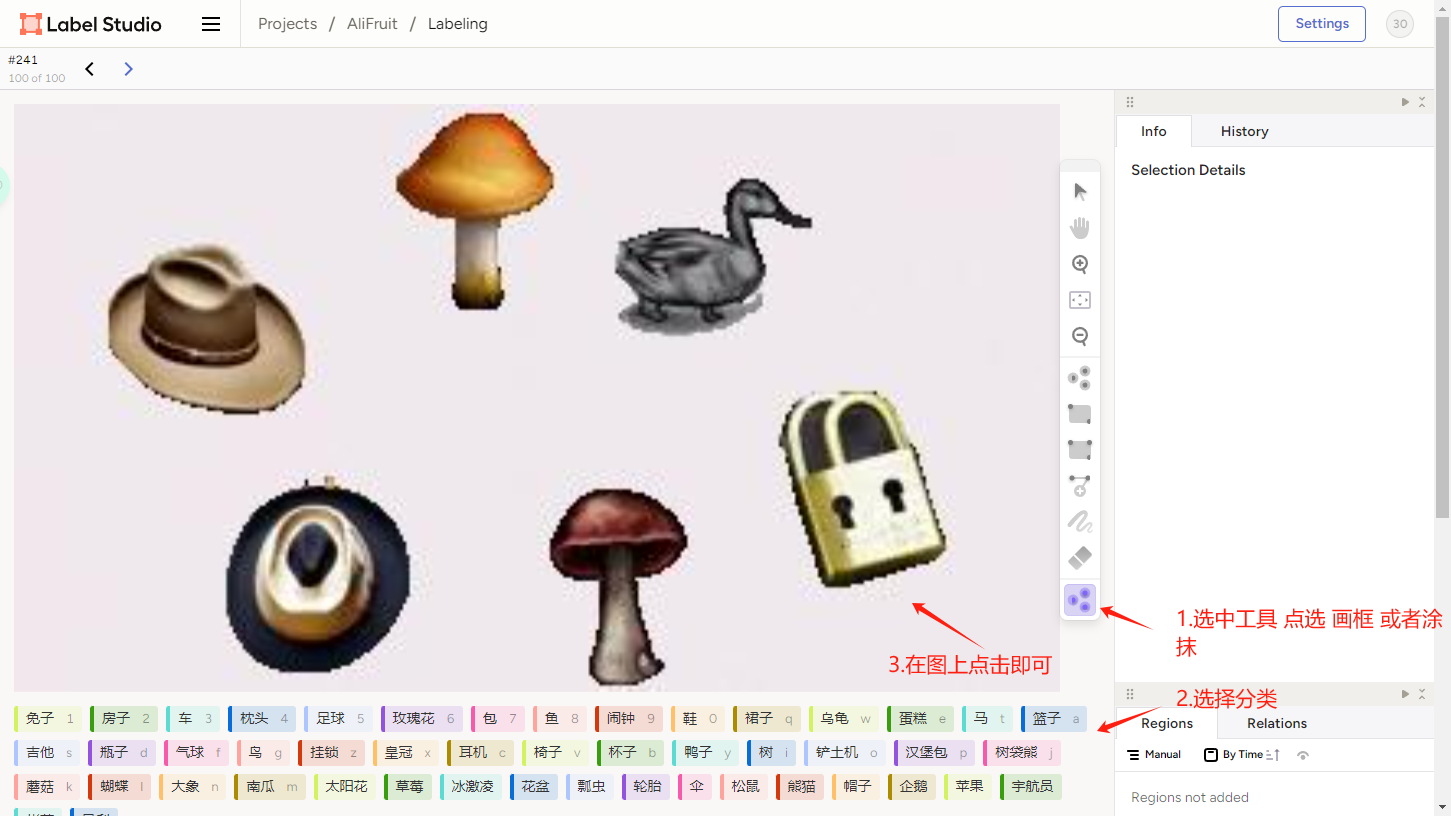
self.classes=['乌龟','企鹅','伞','免子','冰激凌','凤梨','包','南瓜','吉他','大象','太阳花','宇航员','帐蓬','帽子','房子','挂锁','杯子','松鼠','枕头','树','树袋熊','椅子','气球','汉堡包','熊猫','玫瑰花','瓢虫','瓶子','皇冠','篮子','耳机','花盆','苹果','草莓','蘑菇','蛋糕','蝴蝶','裙子','足球','车','轮胎','铲土机','闹钟','鞋','马','鱼','鸟','鸭子']
def letterbox(self,img, new_shape=(640, 640), color=(114, 114, 114), auto=False, scaleFill=False, scaleup=True,stride=32):
'''图片归一化'''
shape = img.shape[:2]
if isinstance(new_shape, int):
new_shape = (new_shape, new_shape)
r = min(new_shape[0] / shape[0], new_shape[1] / shape[1])
if not scaleup:
r = min(r, 1.0)
ratio = r, r
new_unpad = int(round(shape[1] * r)), int(round(shape[0] * r))
dw, dh = new_shape[1] - new_unpad[0], new_shape[0] - new_unpad[1]
if auto:
dw, dh = np.mod(dw, stride), np.mod(dh, stride)
elif scaleFill:
dw, dh = 0.0, 0.0
new_unpad = (new_shape[1], new_shape[0])
ratio = new_shape[1] / shape[1], new_shape[0] / shape[0]
dw /= 2
dh /= 2
if shape[::-1] != new_unpad:
img = cv2.resize(img, new_unpad, interpolation=cv2.INTER_LINEAR)
top, bottom = int(round(dh - 0.1)), int(round(dh + 0.1))
left, right = int(round(dw - 0.1)), int(round(dw + 0.1))
img = cv2.copyMakeBorder(img, top, bottom, left, right, cv2.BORDER_CONSTANT, value=color)
return img, ratio, (dw, dh)
def infer(self,src_img):
'''执行前向操作预测输出'''
or_img = self.letterbox(src_img, (640, 640), stride=32)[0]
img = or_img[:, :, ::-1].transpose(2, 0, 1)
img = img.astype(dtype=np.float32)
img /= 255.0
img = np.expand_dims(img, axis=0)
pred = self.onnx_session.run(None, {self.onnx_session.get_inputs()[0].name: img})[0]
outbox = model.extrack(pred, 0.5, 0.5)
return outbox
def nms(self, dets, thresh):
x1 = dets[:, 0]
y1 = dets[:, 1]
x2 = dets[:, 2]
y2 = dets[:, 3]
areas = (y2 - y1 + 1) * (x2 - x1 + 1)
scores = dets[:, 4]
keep = []
index = scores.argsort()[::-1]
while index.size > 0:
i = index[0]
keep.append(i)
x11 = np.maximum(x1[i], x1[index[1:]])
y11 = np.maximum(y1[i], y1[index[1:]])
x22 = np.minimum(x2[i], x2[index[1:]])
y22 = np.minimum(y2[i], y2[index[1:]])
w = np.maximum(0, x22 - x11 + 1)
h = np.maximum(0, y22 - y11 + 1)
overlaps = w * h
ious = overlaps / (areas[i] + areas[index[1:]] - overlaps)
idx = np.where(ious <= thresh)[0]
index = index[idx + 1]
return keep
def xywh2xyxy(self, x):
y = np.copy(x)
y[:, 0] = x[:, 0] - x[:, 2] / 2
y[:, 1] = x[:, 1] - x[:, 3] / 2
y[:, 2] = x[:, 0] + x[:, 2] / 2
y[:, 3] = x[:, 1] + x[:, 3] / 2
return y
def extrack(self, output, conf_thres=0.5, iou_thres=0.5):
output = np.squeeze(output)
outputcheck = output[..., 4] > conf_thres
output = output[outputcheck]
for i in range(len(output)):
output[i][5] = np.argmax(output[i][5:])
output = output[..., 0:6]
output = self.xywh2xyxy(output)
output1 = self.nms(output, iou_thres)
outputlist = []
for i in output1:
outputlist.append(output[i])
outputlist = np.array(outputlist)
return outputlist
def deal_que_new_img(bin_image):
img = Image.open(BytesIO(bin_image)).convert("RGBA")
background = Image.new("RGBA", img.size, (255, 255, 255, 255))
img = Image.alpha_composite(background, img)
image = img.crop((143, 0, img.size[0], img.size[1]))
ocr_res = ocr.classification(image).split('后')[0]
logger.info(f"识别结果:{ocr_res}")
return ocr_res
def draw(image, box_data):
boxes = box_data[..., :4].astype(np.int32)
scores = box_data[..., 4]
classes = box_data[..., 5].astype(np.int32)
for box, score, cl in zip(boxes, scores, classes):
top, left, right, bottom = box
cv2.rectangle(image, (top, left), (right, bottom), (255, 0, 0), 2)
cv2.putText(image, '{0} {1:.2f}'.format(0, score), (top, left), cv2.FONT_HERSHEY_SIMPLEX, 0.6, (0, 0, 255), 2, lineType=cv2.LINE_AA)
@app.route('/getdetectresult', methods=['POST'])
def getdetectresult():
notitme=time.time()
try:
jsondata = request.json
print(jsondata)
title_img1 = jsondata.get("title_img1")
print(title_img1)
background_img = jsondata.get("background_img")
que_img = b64decode(title_img1.split('base64,')[-1])
queue = deal_que_new_img(que_img)
back_img = b64decode(background_img.split('base64,')[-1])
back_img = cv2.imdecode(np.frombuffer(back_img, np.uint8), cv2.IMREAD_COLOR)
result = model.infer(back_img).tolist()
queid = model.classes.index(queue.split("个")[-1])
rere = [i for i in result if int(i[5]) == queid]
rere.sort(key=lambda x: x[2])
drawdict = rere[-1]
result_x = int(drawdict[2] / 640 * back_img.shape[1])
logger.info(f"{queue}\t{result_x}\t{result}")
except Exception as e:
logger.error(e)
return {"code":-1,"msg":"未识别到","data":[]}
logger.info(f"耗时:{time.time()-notitme}")
return {"code":0,"msg":"识别成功","data":{"x":result_x,"queue":queue,"result_detect":result}}
if __name__=="__main__":
ocr = DdddOcr(show_ad=False)
model = YOLOV5_ONNX(onnx_path="./AliFruit.onnx")
app.run(host='0.0.0.0', port=8848, debug=True)
|